
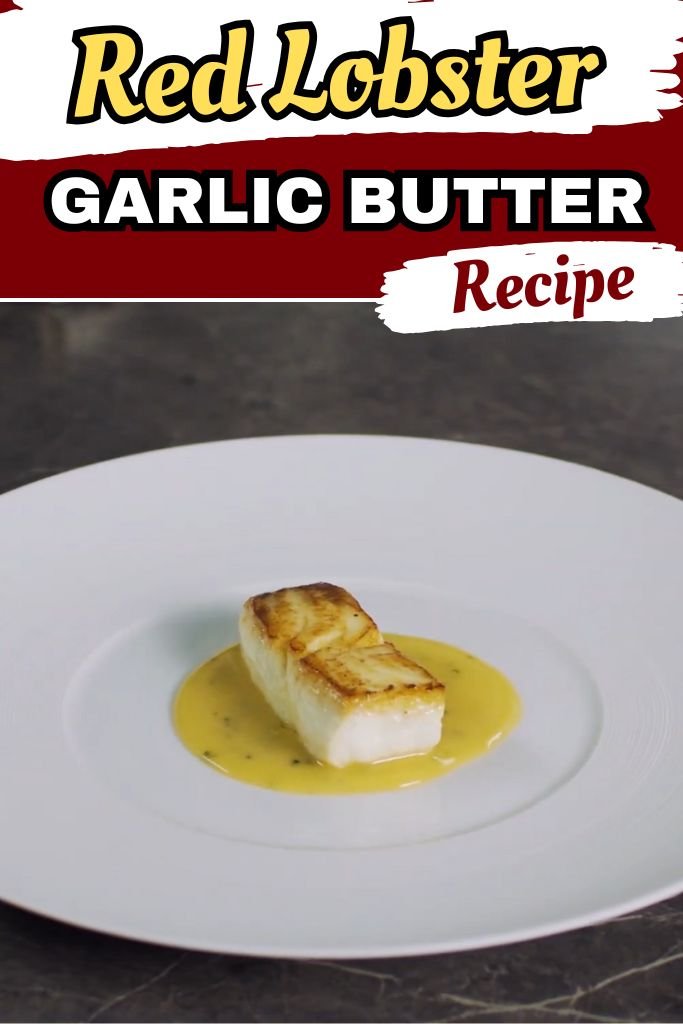
Red Lobster is known for one thing above all else: their amazing garlic butter sauce. This creamy, golden topping makes their seafood taste so good. Many people wonder what they put in it. The answer is simpler than you think.
Red Lobster uses roasted garlic, real butter, and a few other simple things. The real secret is how they prepare the garlic.
Most people think garlic butter means raw garlic mixed with butter. That is not what Red Lobster does. They roast whole garlic heads for hours until they turn soft and sweet. This process changes garlic completely.
Raw garlic tastes sharp and strong. Roasted garlic tastes mild, creamy, and almost nutty. This is the difference that makes their sauce so special.
I promise you will never regret making this copycat Red Lobster Garlic Butter Recipe at home. It takes a little time to roast the garlic, but the results are worth every minute.
What Brand of Butter is Best?
For the best results with your Red Lobster Garlic Butter Recipe, use a high-quality unsalted butter.
Brands like Kerrygold or Land O’ Lakes work really well. Unsalted butter lets you control exactly how salty the sauce becomes.
Stay away from margarine or butter spreads because they don’t create that rich, creamy texture you need.
The butter should be at room temperature before mixing, so take it out about thirty minutes before you start cooking.
You’ll Love This Copycat Recipe Because…
There are so many reasons why this recipe works so well. Here are the top ones:
It tastes just like the original. This copycat version captures that same smooth, garlicky flavor you get at Red Lobster. People will think you brought it home from the restaurant.
It saves you money. Eating out every time you want garlic butter adds up fast. Making it at home costs much less, and you get a bigger batch.
You control the ingredients. You know exactly what goes into your butter. No preservatives, no mystery additives. Just real, simple ingredients.
It lasts a long time. Once you make a batch, you can keep it in the fridge for weeks or freeze it for months. You always have some ready when you need it.
Red Lobster Garlic Butter Ingredients
Before getting started, make sure everything is ready. Most of these ingredients are easy to find in any grocery store. You can also try simple swaps if something isn’t available.
- Unsalted Butter (1 cup, at room temperature): Soft butter mixes better with roasted garlic and cheese. Unsalted gives you full control over how salty you want your butter to be. You can use salted butter, but then skip extra salt later.
- Garlic (2 whole heads): Fresh garlic gives the best taste. Roast it slowly to make it soft and sweet instead of sharp. This brings a deep, rich flavor to the butter.
- Olive Oil (enough to cover the garlic): A good olive oil is used to cook the garlic slowly. This process, called confit, makes the garlic incredibly tender and flavorful.
- Kosher Salt (1 teaspoon, plus more for roasting): Salt brings out all the other flavors. The kosher kind is great because it dissolves evenly.
- Grated Parmesan Cheese (1/4 cup): Use real Parmesan cheese from a block if you can. It adds a salty, savory taste that makes the butter even better. The pre-grated kind in bags does not melt as well.
- Fresh Chives (2 tablespoons, finely chopped): Chives add a little bit of fresh, onion-like flavor and a nice green color. You can use parsley if it is all you have.
Recommended Equipment
- Aluminum foil – for wrapping the garlic tightly
- Baking tray – holds the wrapped garlic while it cooks
- Small knife – to cut the garlic base easily
- Mixing bowl – for blending the butter and other ingredients
- Wooden spoon – to mix smoothly without breaking the texture
- Plastic wrap – to shape and store the butter
- Pan – to make a quick sauce later
- Measuring spoons – for accurate seasoning
How to Make Red Lobster Garlic Butter at Home
Step 1 | Roast the Garlic
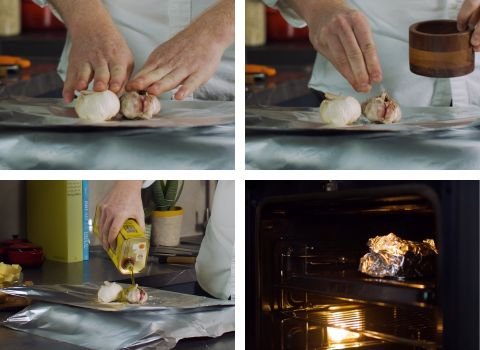
Take two layers of aluminum foil. Place whole garlic bulbs in the center. Sprinkle a good pinch of salt over them.
Pour some olive oil on top to coat them well. Wrap the foil tightly with no open space. Place it on a baking sheet.
Bake in the oven at 250 °F (120 °C) for about 2 hours. This slow cooking makes the garlic soft and sweet.
Step 2 | Squeeze the Garlic Pulp
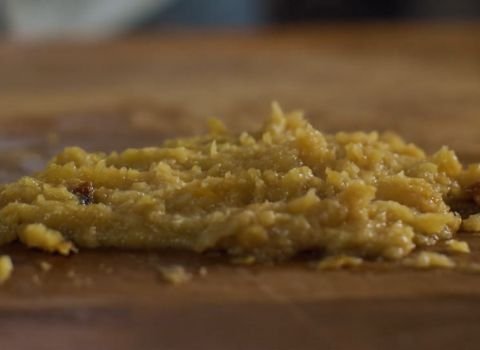
Once the garlic is cool enough to touch, cut off the base with a serrated knife. Hold the top and press gently.
The soft garlic pulp will slide out easily. Use a small spoon to collect all the pulp. It should feel soft like warm butter.

Step 3 | Mash to a Smooth Paste
Place the roasted garlic pulp on a cutting board. Use the flat side of your knife to mash it until it becomes smooth. This makes the sauce creamy.
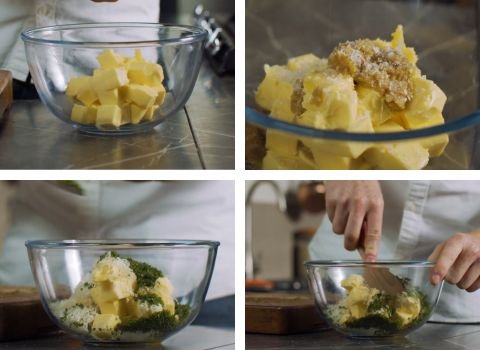
Step 4 | Mix with Butter
In a mixing bowl, add the unsalted butter. Drop in the garlic purée, salt, Parmesan, and chives. Stir with a wooden spoon until it’s smooth and fully mixed. It should have a soft, creamy texture.
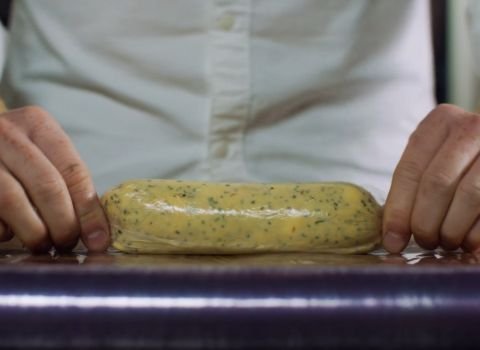
Step 5 | Shape and Store
Place the butter on plastic wrap. Roll it into a sausage shape. Twist the ends to seal it well.
Store in the fridge for 3 to 4 hours until firm. It can stay fresh for up to 4 weeks in the fridge or even longer in the freezer.
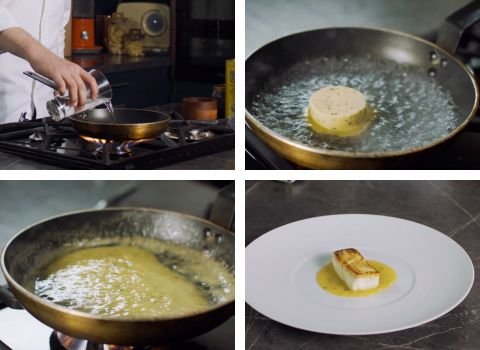
Step 6 | Use It as a Sauce
When ready to use, heat a pan and add 3–4 milliliters of water. Drop in a thick slice of the garlic butter.
As the water boils, the butter melts and blends into a smooth, glossy sauce. No need to stir too much. Add a squeeze of lemon at the end for brightness.
Recipe Perfection Tips
- Get the Roasting Temperature Right: Don’t rush this step by turning up the heat. Two hundred fifty degrees might seem low, but that’s exactly the point. Low heat makes the garlic sweet and creamy. High heat turns garlic bitter and grainy.
- Don’t Skip the Cooling Step: Let the roasted garlic cool completely before squeezing out the pulp. Rushing this means the pulp stays hot and won’t mash smoothly. Hot garlic also breaks down faster during storage.
- Use a Wooden Spoon for Mixing: Metal spoons can break the smooth texture of cold butter. A wooden spoon is gentler and helps everything blend evenly without creating cold spots.
- Slice Thinly for Faster Melting: Cut your butter roll into quarter-inch slices for sauces. Thinner pieces melt faster and distribute more evenly in your pan.
- Add Fresh Lemon at the End: Never cook lemon juice into the sauce. Add it just before serving. Cooked lemon becomes bitter and harsh instead of bright and fresh.
- Keep it Frozen Until Needed: Store in the coldest part of your freezer for the longest life. Frozen garlic butter can last two to three months without losing quality.
How To Use Garlic Butter
Garlic butter adds flavor to almost everything. Melt it over shrimp, lobster tails, or grilled fish for that Red Lobster-style taste.
It’s great for spreading on warm bread or mixing into pasta for a quick meal.
You can also brush it on corn, baked potatoes, or even steak before grilling.
Try tossing cooked noodles with a spoonful of this butter and a sprinkle of cheese. It gives them a rich, smooth flavor.
It’s also perfect for dipping seafood, adding flavor to rice, or coating roasted vegetables.
How Do I Know When My Garlic Butter Has Gone Bad?
Fresh garlic butter should smell like sweet roasted garlic with a hint of cheese and herbs. The color should be light yellow or cream colored.
Bad garlic butter will smell sour or rancid. The color might look darker or have spots of mold on it.
The texture might separate with liquid pooling around the edges. Always check your garlic butter before using it.
Make-Ahead and Storage Instructions
1. Make Ahead: You can prepare this garlic butter days in advance. Just roll it up in plastic wrap and chill it in the fridge. The flavor actually gets better after sitting overnight, as the garlic blends more with the butter.
2. How to Store: Keep the butter wrapped tightly in the refrigerator. It stays good for up to 4 weeks. Always use a clean knife to slice it, so it stays fresh and clean.
3. Freezing Instructions: Wrap the butter in plastic wrap and then place it inside a freezer-safe bag. Store it for up to 6 months. When ready to use, just cut off a piece and let it sit at room temperature for 10–15 minutes to soften.
Red Lobster Garlic Butter Recipe FAQs
1. My butter turned out a bit grainy. What did I do wrong?
Grainy butter usually means it was too cold. Always use room-temperature butter that feels soft.
Mash the roasted garlic until smooth before mixing, or small lumps can make it grainy. Stir gently with a wooden spoon instead of a mixer to keep it creamy.
2. How do I fix it if the butter is too salty?
Add a little plain unsalted butter to tone down the salt. Taste as you mix.
Next time, use less kosher salt or skip it when using salted butter. Parmesan is salty too, so add it slowly.
3. How do I know when the garlic is perfectly roasted?
The garlic will turn golden brown and feel soft when squeezed gently. It should smell sweet and nutty. If it’s still white and firm, it needs more roasting time.
4. Why did you add water when making the sauce?
Adding a small splash of water to the pan helps the butter melt evenly. It also keeps the butter from burning too quickly.
The water and butter mix together as they heat up, creating a smooth, emulsified sauce that coats your food perfectly.
5. Is there a way to make this garlic butter without an oven?
You can roast the garlic on the stovetop. Separate the cloves from the head but keep their skins on.
Put them in a small pan and cover them with olive oil. Cook on very low heat for about 30-40 minutes, until the garlic is soft and golden.
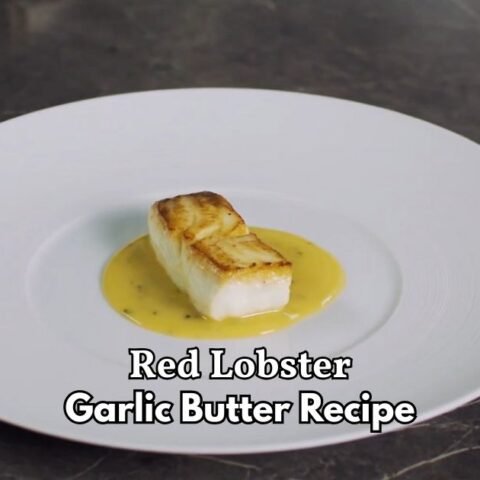
Red Lobster Garlic Butter Recipe
Copycat Red Lobster Garlic Butter Recipe – Make restaurant-style garlic butter at home in just 3 hours! Rich, creamy & perfect for seafood lovers.
Ingredients
- 1 cup unsalted butter (at room temperature)
- 2 whole heads garlic
- Olive oil (enough to cover the garlic)
- 1 teaspoon kosher salt, plus more for roasting
- ¼ cup grated Parmesan cheese
- 2 tablespoons fresh chives, finely chopped
Instructions
- Take two layers of aluminum foil. Place whole garlic bulbs in the center. Sprinkle a good pinch of salt over them. Pour some olive oil on top to coat them well. Wrap the foil tightly with no open space. Place it on a baking sheet. Bake in the oven at 250 °F (120 °C) for about 2 hours. This slow cooking makes the garlic soft and sweet.
- Once the garlic is cool enough to touch, cut off the base with a serrated knife. Hold the top and press gently. The soft garlic pulp will slide out easily. Use a small spoon to collect all the pulp. It should feel soft like warm butter.
- Place the roasted garlic pulp on a cutting board. Use the flat side of your knife to mash it until it becomes smooth. This makes the sauce creamy.
- In a mixing bowl, add the unsalted butter. Drop in the garlic purée, salt, Parmesan, and chives. Stir with a wooden spoon until it’s smooth and fully mixed. It should have a soft, creamy texture.
- Place the butter on plastic wrap. Roll it into a sausage shape. Twist the ends to seal it well. Store in the fridge for 3 to 4 hours until firm. It can stay fresh for up to 4 weeks in the fridge or even longer in the freezer.
- When ready to use, heat a pan and add 3–4 milliliters of water. Drop in a thick slice of the garlic butter. As the water boils, the butter melts and blends into a smooth, glossy sauce. No need to stir too much. Add a squeeze of lemon at the end for brightness.
Nutrition Information:
Serving Size: 1Amount Per Serving: Calories: 118Total Fat: 12.7gSaturated Fat: 7.9gCholesterol: 31mgSodium: 110mgCarbohydrates: 0.6gFiber: 0.1gSugar: 0.1gProtein: 0.9g
This Red Lobster Garlic Butter Recipe brings a rich, creamy taste to any dish. The roasted garlic and melted butter blend together to create a smooth and flavorful sauce that’s easy to make at home.
Try making it yourself and share your thoughts in the comments below. You can also tag photos of your homemade garlic butter to show how it turned out.